Load and run YOLO (You Only Look Once) object detection model on a Raspberry Pi and track objects throughout the day.
In my last post I wrote about the YOLO model used for object detection. The most surprising thing was how simple the model is. It’s so simple that it can run offline on a raspberry pi
In my last post I wrote about the YOLO (You Only Look Once) model used for object detection. The most surprising thing when reading the paper was how clever and relatively simple the model is. The strength lies in the fact that the model only passes through the image once and from that single pass, is able to detect a number of objects. The architecture also allows mini versions with fewer layers, a smaller size but similar performance.
In fact, the model is so small it can run offline on a weak device such as a rapberry pi. This is just what I did.
TLDR
I have two cats and I wanted to track their whereabouts when I was not at home. So I setup a raspberry pi to take periodically take a picture, detect the picture for objects and save the object locations down to a json file. After the objects were processed, I then wrote a script that applies a kind of heatmap on a base image with where the provided objects were over all the logs.
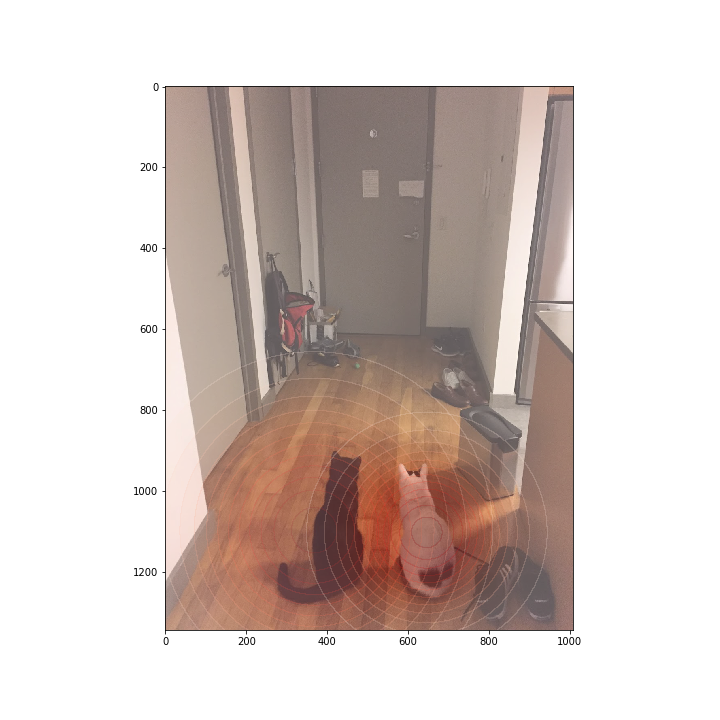
My cats eagerly awaiting the return of my wife
The project requires tensorflow, keras, numpy and matplotlib to be installed on your raspberry pi. I have some notes below on getting those installed. Below will set everything up and take a photo every minute until stopped, detect object and save them in json format in the logs directory.
git clone [https://github.com/breeko/spypy.git](https://github.com/breeko/spypy.git)
cd spypy
./download_weights.sh # or just download weights manually
python track.py
Once enough logs are saved, the below will convert the logs from the log directory and overlay the objects onto the input image. The object value has to be an object that the model was trained on, which is visible from the .classes file in the model directory.
python convert.py -i [input_image to draw over] -d [directory of logs] -o [object to detect]
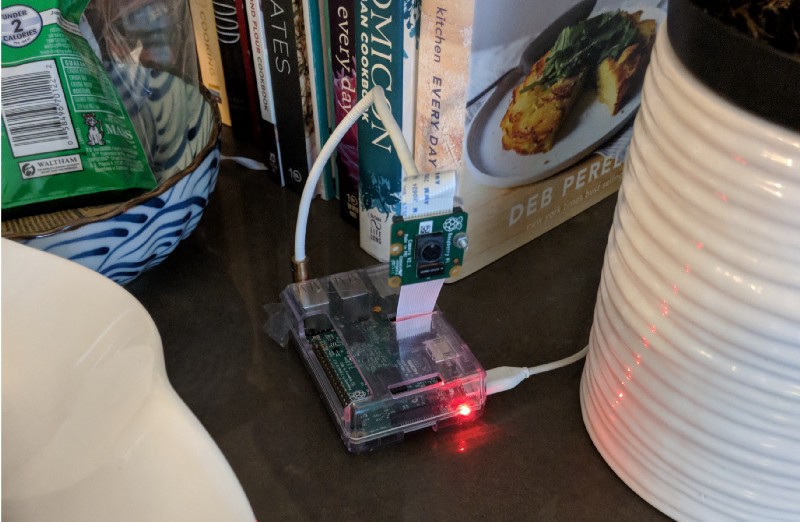
I spy a Rapberry Pi
Dependencies
The most frustrating part was getting tensorflow and Keras to run on raspberry pi. Not because the pi is not powerful enough, but the standard methods to install tensorflow did not work for me (e.g. pip) and there is less support for weaker ARM hardware. I was able to install the tensorflow for python 2.7, but 3.4+ was not working for me. I won’t discuss it here in length, but here are the links that worked for me.
Tensorflow wheel (install with pip)
Object recognition
The first step is being able to detect the images.
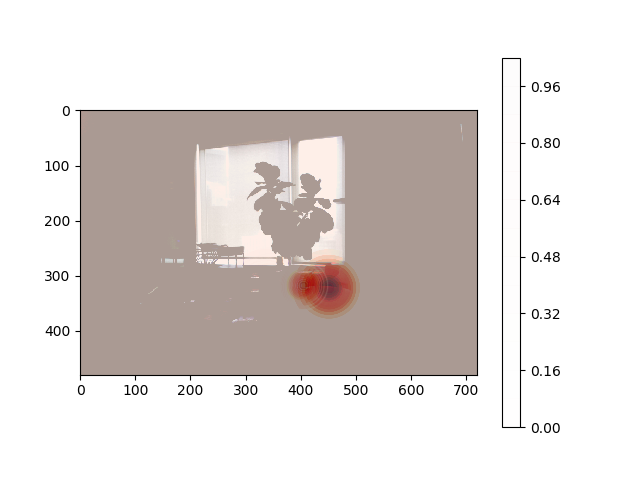
{{ figure src=”/post/resources/img/1*VZPf2wq8AIjASwy0IfARCA.png” title="He loves those stools” }}
I wrote at length in my last post about how object detection works, so I won’t go over much here. The file detect.py has a function called detect_from_image that creates the model based on provided config file and weights. The model takes about a minute to load from the config and weights (raspberry pi v3), but it only needs to load once.
The function then runs the image through the model and parses out the response, maps the object output to their respective class names and re-scales the response to the original image size and returns a dictionary of the objects detected.
Below is the signature of the main function in detect:
def detect_from_image(
  image,
  anchors_path,
  classes_path,
  config_path,
  weights_path,
  min_confidence,
  max_overlap,
  model_image_size):
The image can either be a string with the image path or a PIL.Image object.
The anchors_path is a list to the location of the anchors. The anchors are space separated values in a text file. The anchors for yolov2 are as follows:
0.57273, 0.677385, 1.87446, 2.06253, 3.33843, 5.47434, 7.88282, 3.52778, 9.77052, 9.16828
You can read more about anchors in my last post under “Clustering Box Dimensions with Anchors”.
The classes_path just lists the classes that the model was trained on in a space separated text file.
The config_path holds the config file of the model. I tried saving the compiled model in .h5 format, but it caused a memory crash on my raspberry pi (v3). So I had to recreate the model every time through the config file and weights. I borrowed code from the great package yad2k (Yet Another Darknet 2 Keras), but judging by the name, there are other options to convert the model to Keras.
The weights_path is a path to the weights. The weights are too large to host on github, but they can be found here.
min_confidence is the minimum confidence level required to have the model detect and save down the location of an object. I found 50% works well
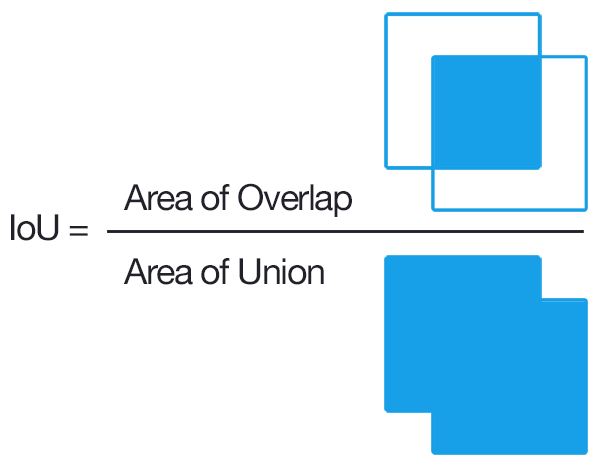
max_overlap is the maximum amount of overlap allowed by the same object. The way that YOLO works means that the same object is likely to be detected several times with overlapping rectangles. In this case, you have to decide if the same object overlaps X% (intersection over union), then just take the object with a higher confidence level. If you set this too low, then you may not detect multiple objects of the same type if they are near each other. If set too high, then you may detect the same object multiple times. I found 0.35 to work well for my purposes.
model_image_size is the size to rescale your image before running it through the network. I found (608,608) to work well.
The final output of the function will be similar to below and scaled to the original image size.
{'cat': [{'center': (1596.50, 1024.16),
   'coors': [(2058.47, 1440.59),
    (2982.40, 2273.46)],
   'h': 832.86,
   'w': 923.93,
   'x': 2058.47,
   'y': 1440.59}],
 'chair': [{'center': (1569.28, 812.05),
   'coors': [(2088.55, 1339.94),
    (3127.08, 2395.71)],
   'h': 1055.77,
   'w': 1038.53,
   'x': 2088.55,
   'y': 1339.94}],
 'suitcase': [{'center': (1330.33, 1028.88),
   'coors': [(1606.64, 1172.80),
    (2159.25, 1460.63)],
   'h': 287.83,
   'w': 552.61,
   'x': 1606.64,
   'y': 1172.80}]}
Tracking the Objects
The tracking takes place in track.py. The file is fairly simple. Tracking can be accessed as follows:
track.py [-h] [-i INTERVAL] [-s START] [-e END] [-d DIR] [--vflip] [--hflip]
interval is the interval in minutes in which you want a picture to be taken
start is the time you want the camera to start (e.g. “10 am”)
end is the time you want the camera to end (e.g. “9 pm”)
directory is the directory that you want the json logs to be saved
vflip|hflip is a flag that tells the camera to vertically|horizontally flip the pictures taken
The file is short enough that its worth looking at in its entirety:
Converting Logs to Heat-maps Overlaid on Images
The final step is converting the logs into heat-maps
convert.py [-h] [-d DIR] [-o OUTPUT] [-i INPUT] [-a ALPHA] [-b OBJECT]
dir is the directory of the log (json) files that contain the object locations
output is the output of the final image
input is the base image to be drawn over
alpha is the redness of the alpha of the circles detecting the objects (higher is darker)
object is the object that you want to detect. If you have a lot of objects detected over a long period of time, you would want to set the alpha to be low, and vice versa.
I didn’t run this long enough to capture any interesting cat location analytics but below is a the final output detecting the placement of cups in my living room throughout the day.
Someone moved my cup!
The code for the heatmap was taken from the github answer on a similar question. It is more of a hack and can definitely be improved. The underlying picture becomes faded and its sometimes tricky to get the right alpha balance but it serves its purpose here.
Next Steps
Detect
- Consider changing over to have Keras do all the manipulations, as opposed to numpy originally used for debugging
- Add support for other machine learning models. I couldn’t get the yolo-mini to produce any meaningful detections so there may be a bug somewhere
- Add support for raspberry pi zero
Track
- Consider using detection to detect when objects in the frame are moving. This will free up a lot of time being spent running the same image through the model and allow for a higher frame count
- Take another look at pickling the model file and reducing the time it takes to load
- More flexibility on start and end input types [DONE]
Convert
- Re-think how the heatmap is drawn
- Expand the convert functionality to support multiple objects being detected and drawn with varying colors and a key
yad2k_out
- Optional verbosity [DONE]
Final Thoughts
A lot of people in the machine learning space are trying to sell you an API and real-time object detection using freely available models developed by others. The fact is that for many applications, you don’t need real-time detection and the models are small enough to run anywhere. It may take you 30 seconds to evaluate the image, but that’s fine for many purposes.
This functionality is very low cost, secure and respectful of privacy. The fact that its cheap to build, relatively simple, fully customizable and able to run offline puts it at an advantage over many more expensive cloud services.
Discussion can be found at hacker news.
By Branko Blagojevic on May 9, 2018