OpenCalc is a mobile calculator written in React Native. Below is a deep dive on the inner workings and design decisions I made on OpenCalc
OpenCalc is a mobile calculator written in React Native. This is my first app using React Native and JavaScript. Below is a deep dive on the inner workings and design decisions I made on OpenCalc…
OpenCalc is a mobile calculator written in React Native. This is my first app using React Native and JavaScript. Below is a deep dive on the inner workings and design decisions I made on OpenCalc. Part 1 will deal with mostly the UI and design elements. Part 2 will deal with how the operations are handled. Available for iOS and Android. Full source on GitHub.
OpenCalc
File Structure
Boiler-Plate File Structure
The file structure of a project conveys a lot of information. When a React Native project is initialized using react-native init [project name], the below files get generated (“>” indicates folders):
> android
App.js
app.json
index.js
> ios
> node modules
package-lock.json
package.json
The android and ios directories are used as the boiler plate platform specific code. You can open up the projects in Android Studio and XCode, respectively, and edit and project specific attributes like icons and bundle identifiers.
app.json contains the app name and display name.
index.js is the entry entry point of your app and is meant to re-direct to the main controller. You can also create an index.ios.js and index.android.js and React Native will use those entry points when building for iOS and Android, respectively. App.js is the main controller
OpenCalc File Structure
The OpenCalc file structure has all the same boiler plate with the actual app in an app directory:
> app
   App.js
   app.json
   > components
       CalculatorAdditionalButtonsContainer.js
       CalculatorButton.js
       CalculatorButtonsContainer.js
       CalculatorLandscapeButtonsContainer.js
       CalculatorResponse.js
   > configs
       Configs.js
   > constants
       Colors.js
       Constants.js
   > core
       > __tests__
         CalculatorBrain-test.js
       CalculatorBrain.js
       Operations.js
       OperationTypes.js
   > utils
       > __ tests__
         Utils-tests.js
         Validator-tests.js
       CalculatorUtils.js
       LayoutBuilder.js
       Orientation.js
       Utils.js
       Validator.js
As mentioned above, the entry point is index.js. Below is index.js for OpenCalc:
import { AppRegistry } from 'react-native';
import App from './app/App';
import { YellowBox } from 'react-native';

AppRegistry.registerComponent('OpenCalc', () => App);
YellowBox.ignoreWarnings(['Warning: isMounted(...) is deprecated', 'Module RCTImageLoader','Class RCTCxxModule']);
The only thing I added was to suppress a few warnings.
Main Controller
The main controller is App.js:
React Native does not force you to break out the style into a separate css. You can, but I found it easier to see everything at once, especially when debugging.
I also used Flow, a static type checker for javascript. I started using it half-way through my project and it proved useful in debugging. When I converted my project to use Flow, I was surprised how many of my functions were handling different type arguments than intended and it all still somehow functioned. Flow forced me to think about my function signatures and focus my code.
Props and Assets
The App class extends Component, React Native’s main class. The Props and State variables are used to store the properties and state of the object, and since I used Flow, I had to define them when creating the class.
type Props = {
  brain: CalculatorBrain,
};

type State = {
  topDisplay: string,
  bottomDisplay: string,
  altButtons: boolean,
  orientation: number,
};
The CalculatorBrain is the main work horse of the app which we’ll get to in part 2. The topDisplay and bottomDisplay are the text fields of the app.
Anytime a State variable gets set, the Component is re-drawn. So the State is how I stored variables that affect the UI.
altButtons indicates whether the second page of buttons is being used. This is only relevant on the portrait mode.
Orienation
I keep track of the orientation when the component gets mounted (componentDidMount) or the orientation changes (_orientationDidChange). I couldn’t find anything in react-native that tells you the orientation but there are a few packages out there that attempt to handle this but I decided to build something simple.
updateOrientation() {
 const orientation = Orientation.getOrientation();
 this.setState({
 orientation: orientation});
}
Orientation.js
//@flow
import {Dimensions} from 'react-native';

export const OrientationType = Object.freeze({
    'Portrait': 1,
    'Landscape': 2,
});

export class Orientation {
    static getOrientation() {
        const {height, width} = Dimensions.get('window');
        return (height > width) ? OrientationType.Portrait : OrientationType.Landscape;
    }
}
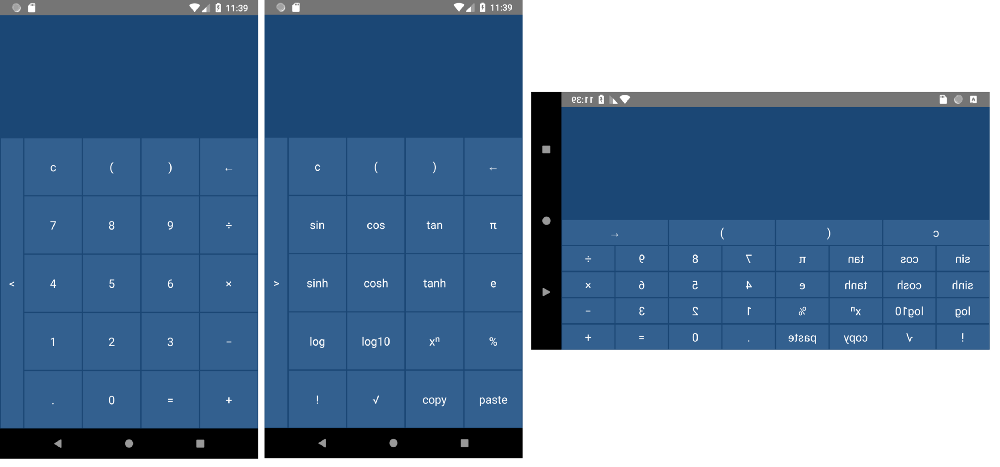
Possible layouts of OpenCalc
The rule I used was if height > width, then the device is in portrait. This doesn’t work so well on Android split view since the screen is technically wider than it is taller (portrait), but I would still prefer the portrait layout.
OpenCalc on split view Android
I tried using other rules (e.g. width has to be 25% greater than height), but it forced some tablet models into portrait mode. I also tried forcing a minimum width to trigger landscape mode, but the correct cutoff was not clear and the ratio is really what matters anyway. In the end, I didn’t think fixing this problem was worth the extra complexity.
Function calls
The below functions are used to connect the component to other functions.
_handleCopyPress
async _handlePastePress
_switchButtons
_handleButtonPress
_deleteLast
Copy and paste
For the copy/paste functionality, I decided to use the clipboard so users can paste from external apps. For the copy, I just checked if the bottom or top display is a number and put that into clipboard. I could have connected the copy/paste functionality to the CalculatorBrain which is doing the work and storing the numbers, but I wanted to make sure the user gets what she expects.
I also made explicit what is being copied since, depending on what’s available, it could be either the top or bottom text (check bottom result first).
_handleCopyPress() {
    const bottomDisplay: string = this.props.brain.getResult().replace(' ','').replace(',','');
    const topDisplay: string = this.props.brain.getDisplay().replace(' ','').replace(',','');
    const saveString = isNumeric(bottomDisplay) ? bottomDisplay : isNumeric(topDisplay) ? topDisplay : null;
    if (saveString) {
      Clipboard.setString(saveString);
      this.refs.toast.show('Copied ' + saveString + ' to clipboard', DURATION.LENGTH_SHORT, () => {});
    } else {
      this.refs.toast.show('Unable to copy to clipboard', DURATION.LENGTH_SHORT, () => {});
    }
  }

async _handlePastePress() {
    const value = await Clipboard.getString();

if (isNumeric(value)) {
      this.props.brain.clear();
      this.props.brain.setItem(value);
      this.updateDisplay();
    } else {
      this.refs.toast.show('Invalid clipboard value of ' + value);
    }
  }

Toast
This is the only place where I used an external package (react-native-toast). This allowed me to display a short temporary message to the user when copying or pasting. Toast is native to Android but Apple doesn’t have anything similar.
Switching layouts
The _switchButtons just updates the altButtons value in the state. This forces the component to re-render which allows me to check the state and render accordingly.
_switchButtons() {
    this.setState({altButtons: !this.state.altButtons});
  }
Handling button presses
The _handleButtonPress and _deleteLast just pass the value on to the CalculatorBrain.
_handleButtonPress(button: string) {
    this.props.brain.setItem(button);
    this.updateDisplay();
    }

_deleteLast() {
    this.props.brain.deleteLast();
    this.updateDisplay();
  }
Rendering
The render function renders the layout. It uses the LayoutBuilder to build the button container. The controller passes all the functions a layout could need and the LayoutBuilder binds them accordingly. The CalculatorResponse component gets passed along the topDisplay and bottomDisplay.
render() {
    const buttonContainer = LayoutBuilder.buildButtonContainer(
      this,
      this.state.orientation,
      this.state.altButtons,
      this._handleButtonPress,
      this._reset,
      this._deleteLast,
      this._handleCopyPress,
      this._handlePastePress,
      this._switchButtons,
    );

return (
      <View style={styles.container} onLayout={this._updateOrientation.bind(this)}>
        <Toast ref="toast" position='top' opacity={0.8}/>
        <CalculatorResponse
          topDisplay={this.state.topDisplay}
          bottomDisplay={this.state.bottomDisplay}/>
        {buttonContainer}
      </View>
    );
  }
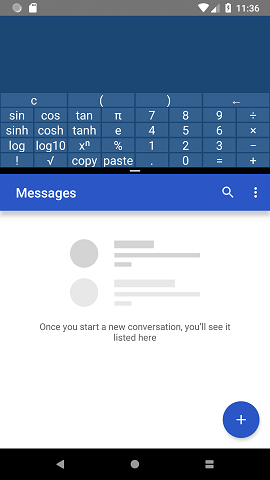
Layouts
There are three possible layouts:
- CalculatorButtonsContainer,
- CalculatorAdditionalButtonsContainer
- CalculatorLandscapeButtonsContainer
The layouts follow the same basic format so I won’t go through each one. This is the CalculatorButtonsContainer which provides the default layout for portrait mode.
There is likely a more succinct way to define a layout, but there are only three layouts and this helped me trouble shoot the flexboxes so I left it this way.
Calculator buttons
Each CalculatorButton takes a handleButtonPress, and for most of them I just pass along the handleButtonPress that was provided. However, a few buttons have special button actions (reset, deleteLast and switchButton). I could have handled this in the handleButtonPress function of the controller and routed accordingly, and if I did it again, I would probably do that.
The CalculatorButton class is light-weight, mostly used to specify the layout
Scaling text
The Text component takes a optional field adjustFontSizeToFit which is unfortunately used just for iOS. But for Android, the button and response texts would get cut-off or look too small depending on the screen size. So I got a font size I liked based on the dimensions I was debugging in. From there I scaled up accordingly based on the max of height and width. I used slightly different max dimensions for iOS and Android.
const Constants = Object.freeze({
    height: Dimensions.get('window').height,
    width: Dimensions.get('window').width,
    maxDimension: Math.max(Dimensions.get('window').height, Dimensions.get('window').width),
    minDimension: Math.min(Dimensions.get('window').height, Dimensions.get('window').width),
    baseMaxDimension: (Platform.OS === 'ios') ? 667.0 : 750.0,
});
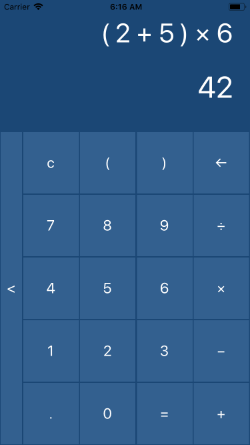
Calculator response
The CalculatorResponse component

One thing new about this view is the SafeAreaView component. This handles the iPhone X notch design. Without this, the response could be cut-off by the camera notch.
The buttons are still partially cut-off in landscape, but if I were to wrap the entire layout in a SafeAreaView, it would look worse. This notch is annoying to deal with and I think it would just encourage developers to force their users into one orientation.
The other thing to note is that the text is wrapped up in a horizontal ScrollView. This allows the user to type arbitrarily long sequences and still see the content.
<ScrollView
          style={styles.resultContainer}
          ref={(scroll) => {this.topDisplayScroll = scroll;}}
          onContentSizeChange={() => {this.topDisplayScroll.scrollToEnd(false);}}
          horizontal>
          <Text adjustsFontSizeToFit numberOfLines={1} style={styles.topDisplay}>{topDisplay}</Text>
        </ScrollView>
But in order to always have the ScrollView scrolled to the end while typing, I had to add add a listener using onContentSizeChange and scroll it to the end with animations set to false.
Part 2
Part 2 will include the core of the brain. This includes actually performing the operations, the operation and operand classes, input validation and tests.
By Branko Blagojevic on July 5, 2018